
Design your own magnetic noticeboard
How to make a popping bulletin board with a little teamwork
Online since: 18/12/2008,
Number of visits: 262012
0
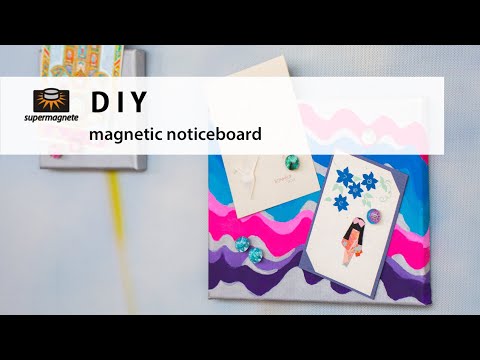
The Göhner family joined forces and created a magnetic noticeboard for their magnets with modelling clay shapes.
Their idea: Add magnetic paint and a unique design to a canvas on a stretcher frame.
Follow this simple tutorial and make your own magnetic noticeboard in just a few steps.

Materials needed for the magnetic noticeboard
- canvas on a stretcher frame
- various acrylic paint colours
- 0,5 litres of DUPLI-COLOR brand magnetic paint
- paintbrush or roller

Paint the canvas with magnetic paint
There are two ways of applying magnetic paint to the canvas on the stretcher frame:Paint the reverse side: If you would like to artistically paint the magnetic canvas or convert an already painted canvas picture into a magnetic noticeboard, simply apply the magnetic paint to the back of the canvas. For this version, you will need more coats of paint and stronger magnets since they have to adhere to the magnetic paint through the paint and canvas.

Paint the front:
If you want to give your magnetic noticeboard a single-colour base coat, you can paint the front with magnetic paint.
This has the advantage that the magnets can stick better to the canvas than if you apply the paint to the back.
Paint the canvas with several coats of magnetic paint using a paint roller or brush. We recommend you apply four to five coats and leave each coat to dry for three to four hours. You can find more information on how to use magnetic paint on our FAQ page about magnetic paint.
Please note:
If you later find that the adhesive force is too weak, you can add more coats of paint.

Paint the canvas with acrylic paint
Paint the front of your magnetic noticeboard with acrylic paint any way you like. Be careful that your coat of paint is not too thick. Our tip: It is advisable to use a roller and, for example, start with a single-colour base coat and to complete or touch up the artwork with paintbrushes once it is dry.Allow sufficient time for your finished work of art to dry.
Afterwards, you can hang your magnetic canvas up and add notes, postcards, and photos – your magnetic noticeboard is ready for use.
Note from the supermagnete team:
Instead of a self-designed canvas, you can, of course, also turn ready-made canvas paintings into magnetic noticeboards.

Suitable magnets for use on the magnetic noticeboard
For your photos and postcards to stick to the magnetic noticeboard, you will need suitable decorative magnets. Magnets should not be too weak for use on the magnetic canvas since they have to adhere to the magnetic paint through the acrylic paint and the canvas. So, if you want to make your own decorative magnets, you should choose slightly stronger neodymium disc magnets. The disc magnets listed below work well. Please note, however, that the magnets could be too strong for use on magnetic boards and other ferromagnetic surfaces and could therefore detach from the decorative element. You can learn how to make the glass magnets pictured above in the customer project Create your own glass magnets.You will also find other great ideas for crafting decorative magnets in the following customer projects:
Disclaimer:
This customer project was sent to us in 2008 by the Göhner family from Regensdorf, Switzerland.
This fantastic application has now been updated by the supermagnete team, and new photos were added too.
Thank you so much for this amazing magnet project!
Notes from the supermagnete team:
- Please take a look at our other applications with magnetic paint.
- For more information about suitable magnets for magnetic paint, please also read our FAQ page Which magnets do you recommend for walls painted with magnetic paint?.
Articles used
Load...


Disc magnet Ø 15 mm, height 3 mm, holds approx. 3,2 kg, neodymium, N45, nickel-plated
| 5 pcs. | 0,83 EUR ea.* | |
| from | 15 pcs. | 0,72 EUR ea.* |
| from | 40 pcs. | 0,64 EUR ea.* |
| from | 80 pcs. | 0,59 EUR ea.* |
| Ask for a rebate from 700 pcs. | ||
Available: 151 440 pcs.

0,5 litre magnetic wall paint, grey, for an area of 1–1,5 m²
Paint your magnetic wall yourself!
Paint your magnetic wall yourself!
| 1 pc. | 31,00 EUR ea.* (62,00EUR/litre) | |
| from | 3 pcs. | 28,15 EUR ea.* (56,30EUR/litre) |
| from | 10 pcs. | 25,60 EUR ea.* (51,20EUR/litre) |
| from | 20 pcs. | 24,35 EUR ea.* (48,70EUR/litre) |
| from | 40 pcs. | 23,25 EUR ea.* (46,50EUR/litre) |
Available: 36 pcs.

1 litre magnetic wall paint, grey, for an area of 2–3 m²
Paint your magnetic wall yourself!
Paint your magnetic wall yourself!
| 1 pc. | 53,80 EUR ea.* (53,80EUR/litre) | |
| from | 3 pcs. | 48,60 EUR ea.* (48,60EUR/litre) |
| from | 10 pcs. | 44,00 EUR ea.* (44,00EUR/litre) |
| from | 20 pcs. | 41,75 EUR ea.* (41,75EUR/litre) |
| from | 40 pcs. | 39,80 EUR ea.* (39,80EUR/litre) |
Available: 44 pcs.

2,5 litre magnetic wall paint, grey, for an area of 5–7,5 m²
Paint your magnetic wall yourself!
Paint your magnetic wall yourself!
| 1 pc. | 95,75 EUR ea.* (38,30EUR/litre) | |
| from | 3 pcs. | 87,55 EUR ea.* (35,02EUR/litre) |
| from | 10 pcs. | 79,20 EUR ea.* (31,68EUR/litre) |
| from | 20 pcs. | 76,65 EUR ea.* (30,66EUR/litre) |
Available: 19 pcs.

magnet glue, waterproof, without solvents, shelf life of 24 months, 20 g tube
To glue on super magnets
To glue on super magnets
| 1 pc. | 7,95 EUR ea.* (397,50EUR/kg) |
Available: 1 436 pcs.

4 litre magnetic wall paint, grey, for an area of 8–12 m²
Paint your magnetic wall yourself!
Paint your magnetic wall yourself!
| 1 pc. | 136,15 EUR ea.* (34,04EUR/litre) | |
| from | 3 pcs. | 125,15 EUR ea.* (31,29EUR/litre) |
| from | 10 pcs. | 115,30 EUR ea.* (28,83EUR/litre) |
| from | 20 pcs. | 110,55 EUR ea.* (27,64EUR/litre) |
Available: 36 pcs.
0 people like this customer project
-Projects are bookmarked in your customer account


The entire content of this site is protected by copyright.
Copying the content or using it elsewhere is not permitted without explicit approval.
Copying the content or using it elsewhere is not permitted without explicit approval.